Tuesday, January 11, 2011

Learning Something New

And then share what you learned with others. That's how I roll. I went to a fun craft gathering the other day and learned how to make necklaces out of jersey knit t-shirts. So simple, they are totally going into my repertoire.

Supplies: A t-shirt (old, new, whatever, as long as it's a knit that stretches), a scissors, some thread and a needle. (You can also had beads (larger ones) if you so choose.

(Note: I happen to be using a shirt with no seams on the sides, you will most likely want to cut those off, use your best judgment.)

Step One: Trim off the bottom seams and then begin cutting 3/4 - 1 In. strips, lengthwise, across the shirt. You will more then likely be cutting up most of the shirt (at least to the armpits).


Step Two: Stretch out each strip, if your seams don't break, you're most likely going to want to cut them anyways, this is up to you though. Once I had all my strips stretching I cut them to the lengths I wanted and lined them up shortest to longest. Since I didn't have any seams, I could cut where ever.


Step Three: Run a needle up and down each side of your strips (I went in the same order). After doing both sides, I stitch them together. I just used a piece of the hem I cut off and used that to hide the stitches. (Just sewing the ends and flipping it over.)

And Ta Da! A fun new piece to wear. Color and options are limitless. This is a great way to recycle/reuse older shirts or ones you can't wear anymore for some reason. Feel free to experiment with how you hide your seams.

Wednesday, December 29, 2010

Blog Transfer

I decided to get rid of my Word Press Blog. I tried it, but I have a hard enough time trying to keep one blog updated, let alone two. Turns out you can't delete Word Press accounts, so it get's to waste space on the internet as an inactive blog. Seams silly to me.


October! Halloween themes and Birthdays.


Thanksgiving!


Christmas Cakes, Chocolate Fix & Red Velvet Cupcakes.


St. Patrick's Day Toppers.


Dad's 50th Birthday Cake.


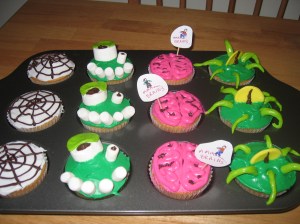
Happy Halloween Cupcakes!


Dharma Cupcakes and Valentine Cupcakes w/ Stencils.


And with Green Cupcakes, you need Green Punch!

St. Patrick’s Day Party Punch
(Alcoholic)

Ingredients:
2 (12 oz) cans frozen limeade concentrate
2 (12 oz) cans frozen lemonade concentrate
2 (2 liter) bottles lemon-lime flavored carbonated soda (I used Sprite)
1 (750 milliliter) bottle rum (I used Bacardi Superior)
2 quarts lime sherbet

In a large pot, combine limeade, lemonade and lemon-lime soda. Stir in rum. Mix in the lime sherbet. (Cuts in 1/2 really well.)


The Hop, a fundraiser in Owatonna for the Clothes Line.


A 6 Layered Rainbow Cake for TB's 21st Birthday


Vegan Chocolate Cake/Cupcakes

Ingredients

  • 1 1/2 cups all-purpose flour
  • 1 cup white sugar
  • 1/4 cup cocoa powder
  • 1 teaspoon baking soda
  • 1/2 teaspoon salt
  • 1/3 cup vegetable oil
  • 1 teaspoon vanilla extract
  • 1 teaspoon distilled white vinegar
  • 1 cup water

Directions

  1. Preheat oven to 350 degrees F (175 degrees C). Lightly grease one 9×5 inch loaf pan.
  2. Sift together the flour, sugar, cocoa, baking soda and salt. Add the oil, vanilla, vinegar and water. Mix together until smooth.

Pour into prepared pan and bake at 350 degrees F (175 degrees C) for 45 minutes for cake (adjust for cupcakes). Remove from oven and allow to cool. Frost.


Betty Crocker Apple Pie
(Tip: Lime Juice keeps the apples green while you're prepping the rest of the pie)

Yarn Weaths


Supplies: A styrofoam wreath (you could use a straw wreath), yarn, felt, scissors, glue (I used a hot glue gun), and any other embellishments your like. Michael's has great berries and glittery picks around the holidays.

Step 1: I take 3 In strips of felt and glue then around the wreath for more cushion or keep the plastic wrapping on the straw wreath. This makes it easier to wrap your wreaths.


Step 2: Wrap your wreath with yarn. You can either start by making a knot, but I just used hot glue. You will want to keep it tight and keep in mind that it is close to impossible to have the yarn perfectly lined up on the entire wreath, so this may take you a while. Thicker yarn goes faster, but it will create a different look. Try different yarns out!!!


Step 3: Making the felt flowers.
  • Cut a circle out of felt. The bigger the circle, the bigger the flower.
  • Cut around the outside of the circle to make it have a waved look.
  • Pick any point on the circle to start cutting the felt. you will be cutting a large spiral shape so that you will end up with one long thin strip of felt.
  • When you get to the very end you will have a circle or oval shape left that you will want to leave and not cut into. this will be the base of your flower.
  • Take the end of the felt where you began cutting and start to roll. You will want to keep it tight in the beginning so it holds. if you want a smaller more circular flower keep it tight. if you want it to have a more open look you can keep it a little more loose as you roll it.
  • Once you get to the end you will glue the bottom onto the flower.
  • Make as many flowers as you'd like. I made mine a few different sizes and colors.
Step 4: Glue and place them randomly and add any other embellishments that you would like.
Step 5: You can add a ribbon, raffia, twine, fabric, etc to hang your wreath with. I just use a wreath hook though.


Tuesday, November 9, 2010

From Halloween!

Can you figure it out...? Yes, I was 'Snakes On A Plane' for Halloween, even though I have never seen the movie.

This was a fun & spooky Halloween Care Package I sent to a lot of my friends both in MN and out of state. Like: Casey in WI, Trista in CO and Christina in OR. I hope everyone enjoyed them. I know the 'hay' was kinda mean. :P

In each of the packages I made fun, somewhat, personalized tombstones for each of my buddies hand painted out of Styrofoam, along with treats and other fun little goodies.